

A Service in Android is an application component used to perform operations that can continue without a user interface. A service can be used for tasks such as music playback, file processing, or other operations that need to continue while the user interacts with the application.
- Services can be started, bound, or both started and bound.
- Foreground services are used for ongoing user-visible work.
- Modern Android restricts unrestricted background services.
Types of Android Services
Android services are commonly discussed based on how they are started and used.

1. Foreground Service
A Foreground Service performs ongoing work that is noticeable to the user. It displays a notification while running and is used for tasks that need to continue for some time.
- Displays a notification while running.
- Suitable for music playback, navigation, and fitness tracking.
- Subject to additional Android restrictions and permissions.
2. Background Services
A Background Service performs work without directly interacting with the user. Modern Android versions restrict background services to improve battery life and system performance.
- Subject to background execution restrictions.
- Not suitable for unrestricted long-running background work.
- WorkManager is generally preferred for deferrable background tasks.
3. Bound Services
A Bound Service allows application components such as Activities to communicate with and interact with the service.
- Allows communication between the client and service.
- Can provide results or services to connected components.
- Continues while it has bound clients.
LifeCycle of Android Services
The lifecycle of an Android Service depends on how the service is started or bound. There are two main interaction models: Started Service and Bound Service.
1. Started Service (Unbounded Service)
A started service begins when an application component calls startService() or startForegroundService().
- onCreate() is called when the service is first created.
- onStartCommand() is called when the service receives a start request.
- The service continues running until it is stopped or the system terminates it.
- stopService() or stopSelf() can be used to stop the service.
- onDestroy() is called before the service is destroyed.
2. Bounded Service
A bound service is used when an application component needs to communicate with the service.
- onCreate() is called when the service is first created.
- onBind() is called when a component binds to the service using bindService().
- The component communicates with the service through the returned IBinder.
- onUnbind() is called when all clients disconnect.
- onDestroy() is called when the service is no longer needed.
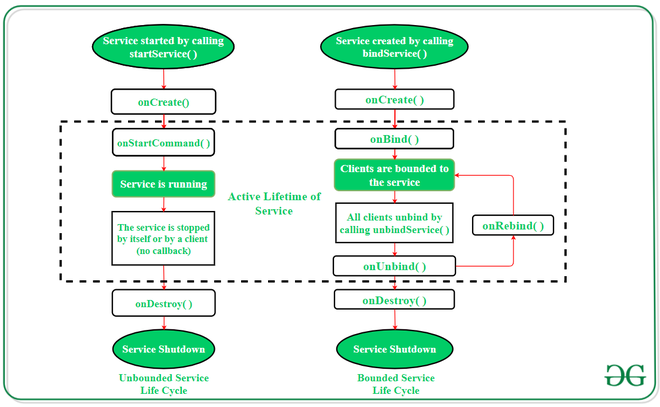
Note: A service can be both started and bound, so its lifecycle can involve both sets of callbacks.
Fundamentals of Android Services
The following are some of the important methods of Android Services:
| Method | Description |
|---|---|
onCreate() | Called when the service is first created. It is generally used for one-time initialization. |
onStartCommand() | Called when a started service receives a start request. It can be called multiple times. |
onBind() | Called when a component binds to the service. It returns an IBinder for communication or null when binding is not supported. |
onUnbind() | Called when all clients have disconnected from the service. |
onRebind() | Called when a new client binds after the service was previously unbound. |
onDestroy() | Called when the service is being destroyed and can be used for cleanup. |
Example of Android Services
Playing music in the background is a very common example of services in android . From the time when a user starts the service, music play continuously in the background even if the user switches to another application. The user has to stop the service explicitly in order to pause the music. Below is the complete step-by-step implementation of this android service using a few callback methods.
Note : Following steps are performed on Android Studio version 4.0
Step 1: Create a new project
- Click on File, then New => New Project.
- Choose Empty Views Activity
- Select language as Java/Kotlin
- Select the minimum SDK as per your need.
Step 2: Modify strings.xml file
All the strings which are used in the activity are listed in this file.
     name="app_name">Services_In_Android
     name="heading">Services In Android
     name="startButtonText">Start the Service
     name="stopButtonText">Stop the Service
Step 3: Working with the activity_main.xml file
Open the activity_main.xml file and add 2 Buttons in it which will start and stop the service. Below is the code for designing a proper activity layout.
    xmlns:android="http://schemas.android.com/apk/res/android"
    xmlns:app="http://schemas.android.com/apk/res-auto"
    xmlns:tools="http://schemas.android.com/tools"
    android:layout_width="match_parent"
    android:layout_height="match_parent"
    android:background="#168BC34A"
    tools:context=".MainActivity">


        android:id="@+id/linearLayout"
        android:layout_width="match_parent"
        android:layout_height="wrap_content"
        android:layout_centerVertical="true"
        android:orientation="vertical"
        app:layout_constraintBottom_toBottomOf="parent"
        app:layout_constraintEnd_toEndOf="parent"
        app:layout_constraintStart_toStartOf="parent"
        app:layout_constraintTop_toTopOf="parent"
        app:layout_constraintVertical_bias="1.0"
        tools:ignore="MissingConstraints">


            android:id="@+id/textView1"
            android:layout_width="match_parent"
            android:layout_height="wrap_content"
            android:layout_marginBottom="170dp"
            android:fontFamily="@font/roboto"
            android:text="@string/heading"
            android:textAlignment="center"
            android:textAppearance="@style/TextAppearance.AppCompat.Large"
            android:textColor="@android:color/holo_green_dark"
            android:textSize="36sp"
            android:textStyle="bold" />


            android:id="@+id/startButton"
            android:layout_width="match_parent"
            android:layout_height="match_parent"
            android:layout_marginStart="20dp"
            android:layout_marginTop="10dp"
            android:layout_marginEnd="20dp"
            android:layout_marginBottom="20dp"
            android:background="#4CAF50"
            android:fontFamily="@font/roboto"
            android:text="@string/startButtonText"
            android:textAlignment="center"
            android:textAppearance="@style/TextAppearance.AppCompat.Display1"
            android:textColor="#FFFFFF"
            android:textStyle="bold" />


            android:id="@+id/stopButton"
            android:layout_width="match_parent"
            android:layout_height="match_parent"
            android:layout_marginStart="20dp"
            android:layout_marginTop="10dp"
            android:layout_marginEnd="20dp"
            android:layout_marginBottom="20dp"
            android:background="#4CAF50"
            android:fontFamily="@font/roboto"
            android:text="@string/stopButtonText"
            android:textAlignment="center"
            android:textAppearance="@style/TextAppearance.AppCompat.Display1"
            android:textColor="#FFFFFF"
            android:textStyle="bold" />


            android:id="@+id/imageView"
            android:layout_width="match_parent"
            android:layout_height="wrap_content"
            android:layout_marginTop="80dp"
            app:srcCompat="@drawable/banner" />
Step 4: Creating the custom service class
A custom service class will be created in the same directory where the MainActivity class resides and this class will extend the Service class . The callback methods are used to initiate and destroy the services. To play music, the MediaPlayer object is used. Below is the code to carry out this task.
import android.app.Service;
import android.content.Intent;
import android.media.MediaPlayer;
import android.os.IBinder;
import android.provider.Settings;
import androidx.annotation.Nullable;

public class NewService extends Service {

    // declaring object of MediaPlayer
    private MediaPlayer player;

    @Override

    // execution of service will start
    // on calling this method
    public int onStartCommand(Intent intent, int flags, int startId) {

        // creating a media player which
        // will play the audio of Default
        // ringtone in android device
        player = MediaPlayer.create( this, Settings.System.DEFAULT_RINGTONE_URI );

        // providing the boolean
        // value as true to play
        // the audio on loop
        player.setLooping( true );

        // starting the process
        player.start();

        // returns the status
        // of the program
        return START_STICKY;
    }

    @Override

    // execution of the service will
    // stop on calling this method
    public void onDestroy() {
        super.onDestroy();

        // stopping the process
        player.stop();
    }

    @Nullable
    @Override
    public IBinder onBind(Intent intent) {
        return null;
    }
}
import android.app.Service
import android.content.Intent
import android.media.MediaPlayer
import android.os.IBinder
import android.provider.Settings

class NewService : Service() {

    // declaring object of MediaPlayer
    private lateinit var player:MediaPlayer

    // execution of service will start
    // on calling this method
    override fun onStartCommand(intent: Intent, flags: Int, startId: Int): Int {

        // creating a media player which
        // will play the audio of Default
        // ringtone in android device
        player = MediaPlayer.create(this, Settings.System.DEFAULT_RINGTONE_URI)

        // providing the boolean
        // value as true to play
        // the audio on loop
        player.setLooping(true)

        // starting the process
        player.start()

        // returns the status
        // of the program
        return START_STICKY
    }

    // execution of the service will
    // stop on calling this method
    override fun onDestroy() {
        super.onDestroy()

        // stopping the process
        player.stop()
    }

    override fun onBind(intent: Intent): IBinder? {
        return null
    }
}
Step 5: Working with the MainActivity file
Now, the button objects will be declared and the process to be performed on clicking these buttons will be defined in the MainActivity class. Below is the code to implement this step.
import androidx.appcompat.app.AppCompatActivity;
import android.content.Intent;
import android.os.Bundle;
import android.view.View;
import android.widget.Button;

public class MainActivity extends AppCompatActivity implements View.OnClickListener {

    // declaring objects of Button class
    private Button start, stop;

    @Override
    protected void onCreate(Bundle savedInstanceState) {
        super.onCreate( savedInstanceState );
        setContentView( R.layout.activity_main );

        // assigning ID of startButton
        // to the object start
        start = (Button) findViewById( R.id.startButton );

        // assigning ID of stopButton
        // to the object stop
        stop = (Button) findViewById( R.id.stopButton );

        // declaring listeners for the
        // buttons to make them respond
        // correctly according to the process
        start.setOnClickListener( this );
        stop.setOnClickListener( this );
    }

    public void onClick(View view) {

        // process to be performed
        // if start button is clicked
        if(view == start){

            // starting the service
            startService(new Intent( this, NewService.class ) );
        }

        // process to be performed
        // if stop button is clicked
        else if (view == stop){

            // stopping the service
            stopService(new Intent( this, NewService.class ) );

        }
    }
}
import android.content.Intent
import android.os.Bundle
import android.view.View
import android.widget.Button
import androidx.appcompat.app.AppCompatActivity

class MainActivity : AppCompatActivity(), View.OnClickListener {

    // declaring objects of Button class
    private var start: Button? = null
    private var stop: Button? = null

    override fun onCreate(savedInstanceState: Bundle?) {
        super.onCreate(savedInstanceState)
        setContentView(R.layout.activity_main)

        // assigning ID of startButton
        // to the object start
        start = findViewById<View>(R.id.startButton) as Button

        // assigning ID of stopButton
        // to the object stop
        stop = findViewById<View>(R.id.stopButton) as Button

        // declaring listeners for the
        // buttons to make them respond
        // correctly according to the process
        start!!.setOnClickListener(this)
        stop!!.setOnClickListener(this)
    }

    override fun onClick(view: View) {

        // process to be performed
        // if start button is clicked
        if (view === start) {

            // starting the service
            startService(Intent(this, NewService::class.java))
        }

        // process to be performed
        // if stop button is clicked
        else if (view === stop) {

            // stopping the service
            stopService(Intent(this, NewService::class.java))
        }
    }
}
Step 6: Modify the AndroidManifest.xml file
To implement the services successfully on any android device, it is necessary to mention the created service in the AndroidManifest.xml file. It is not possible for a service to perform its task if it is not mentioned in this file. The service name is mentioned inside the application tag .
 xmlns:android="http://schemas.android.com/apk/res/android"
    package="com.example.services_in_android">


        android:allowBackup="true"
        android:icon="@mipmap/ic_launcher"
        android:label="@string/app_name"
        android:roundIcon="@mipmap/ic_launcher_round"
        android:supportsRtl="true"
        android:theme="@style/AppTheme">
         android:name=".MainActivity">

                 android:name="android.intent.action.MAIN" />
                 android:name="android.intent.category.LAUNCHER" />


            android:name="preloaded_fonts"
            android:resource="@array/preloaded_fonts" />


         android:name=".NewService"/>