Migrate MongoDB to Azure DocumentDB online by using Azure DocumentDB migration extension
In this tutorial, use the Azure DocumentDB Migration Extension in Visual Studio Code to create and manage migration jobs from an on-premises or cloud instance of MongoDB to Azure DocumentDB. This extension provides a developer-friendly interface for performing migrations without service interruptions. The extension eliminates the need for extra infrastructure and offers secure connectivity, zero-cost usage, and granular control over which databases and collections to migrate.
This article focuses on using the extension's integrated workflow to simplify migration steps directly within Visual Studio Code. This approach is ideal for scenarios where you want a streamlined, managed experience with minimal complexity and maximum reliability.
Prerequisites
An Azure subscription. If you don't have an Azure subscription, create a free account.
Before starting the migration, prepare your Azure DocumentDB account and your existing MongoDB instance for migration.
MongoDB instance (source)
Complete the premigration assessment to check for incompatibilities and warnings between your source instance and target account.
Add a user with readAnyDatabase and clusterMonitor permissions, unless one already exists. Use this credential while creating migration jobs in the extension.
Add the MongoDB server you want to migrate to the Document DB Connections list.
Select Add New Connection.
On the navigation bar, select Connection String.
Paste your connection string: mongodb://:@localhost:10260/?tls=true&tlsAllowInvalidCertificates=true&authMechanism=SCRAM-SHA-256
From the DocumentDB Connections, select the connection and expand it to connect.
Invoke the Migration Extension
You can invoke the Migration Extension from the DocumentDB Connections.
Right-click on an expanded (connected) connection.
Select Data Migration from the context menu.
From the command palette, select Migration to Azure DocumentDB.
Then select Migrate to Azure DocumentDB.
A migration wizard guides you through the process.
Create a migration job
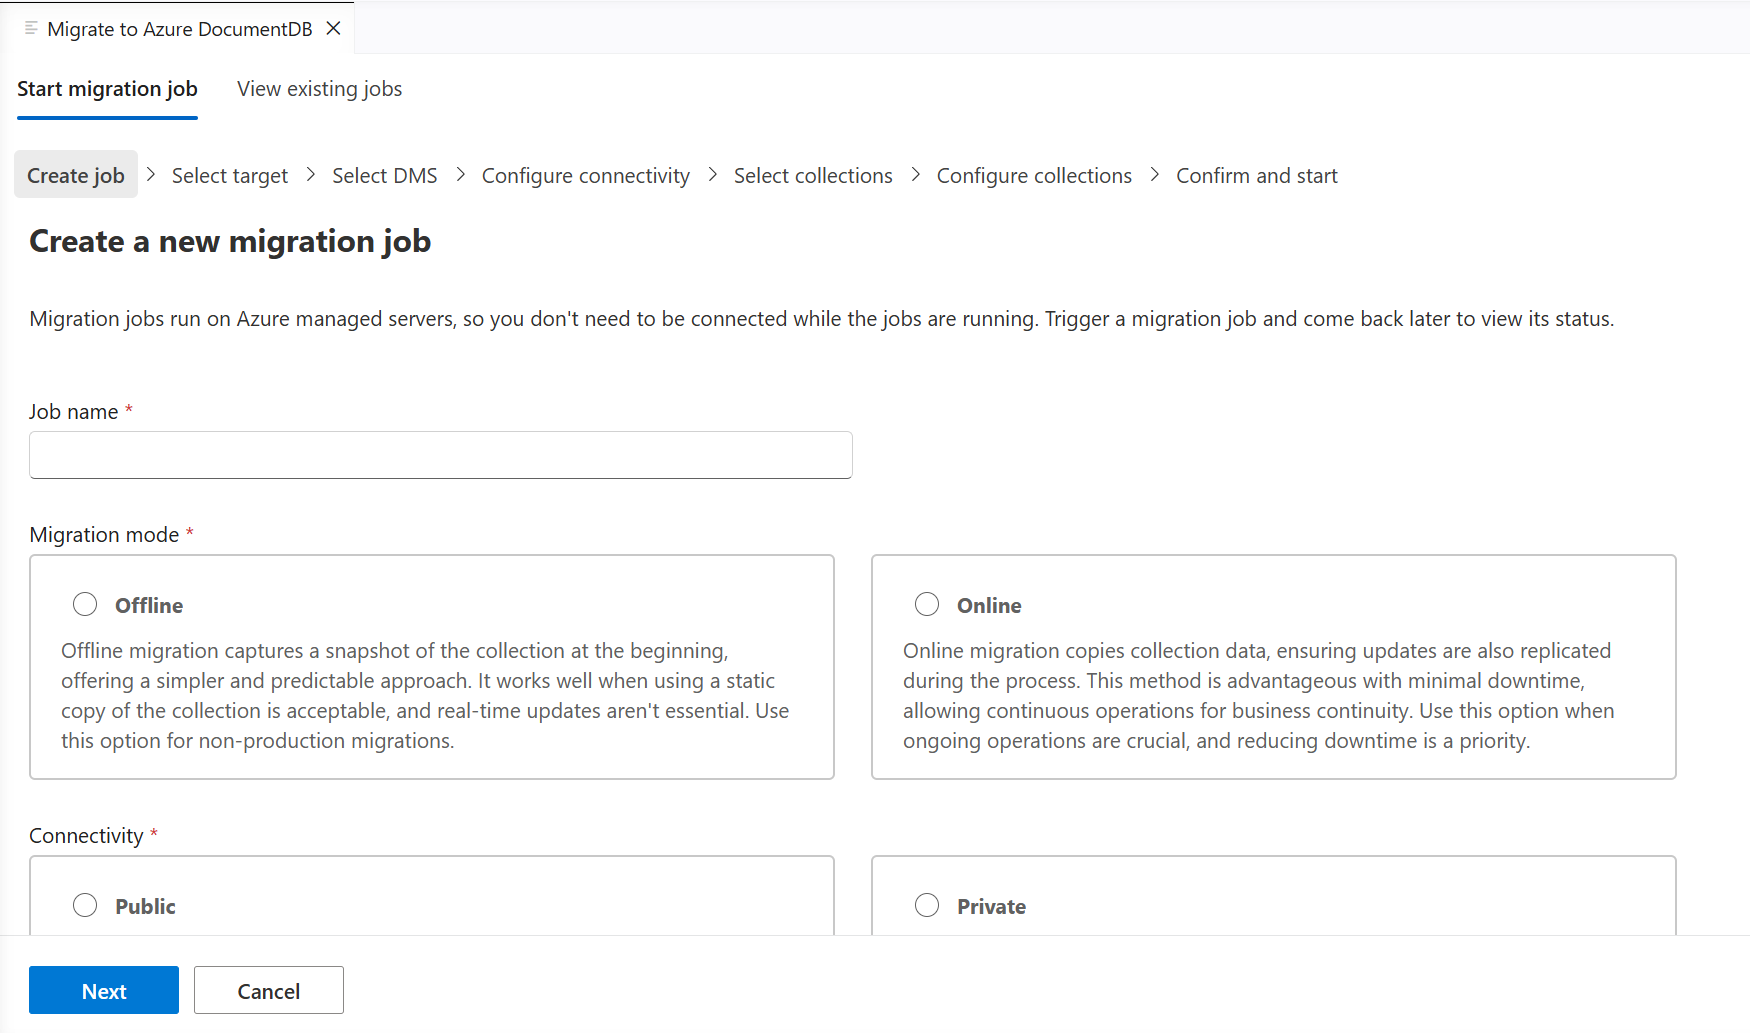
Use a migration job to migrate a group of collections from the source to the destination Azure DocumentDB. The create migration job wizard has seven steps.
Step 1: Create job
In this step, enter the basic details for the job.
Job Name: Enter a user-friendly name to identify the migration job.
Migration Mode: Select the migration mode that's most appropriate for your use case.
Online migration copies collection data and ensures updates are also replicated during the process. This method minimizes downtime, so you can keep operations running for business continuity. Use this option when ongoing operations are crucial, and reducing downtime is a priority.
Offline migration captures a snapshot of the database at the beginning, offering a simpler and predictable approach. It works well when using a static copy of the database is acceptable, and real-time updates aren't essential.
Important
To ensure successful online migrations from MongoDB, you must enable ChangeStream on the source MongoDB server. Without ChangeStream, the migration process doesn't capture any modifications made to the data after the initial migration. Therefore, use the online migration mode only if ChangeStream is enabled on your source MongoDB server.
Connectivity: Depending on your organization's security mandate and network setup, choose from Public and Private.
Use Public when the source and target servers are accessible over the internet through public IPs. It enables support for services that require external accessibility.
Use Private when either the source or target servers are accessible exclusively through private IPs within a virtual network. It enhances security by eliminating exposure to the public internet.
Select Next to continue.
Step 2: Select target
Select an existing Azure DocumentDB account and provide its connection string.
Select the subscription, resource group, and Azure DocumentDB account from the dropdowns.
Enter the connection string to the Azure DocumentDB account.
Ensure the IP listed in the screen is allowed on the Azure DocumentDB firewall.
Select Next to continue.
Step 3: Select Database Migration Service(DMS)
Azure Database Migration Service is a service that migrates data to and from Azure data platforms by using cloud infrastructure for data transfer, instead of relying on local resources. Choose an existing Azure Database Migration Service instance from the dropdown or select Create DMS to create a new migration service.
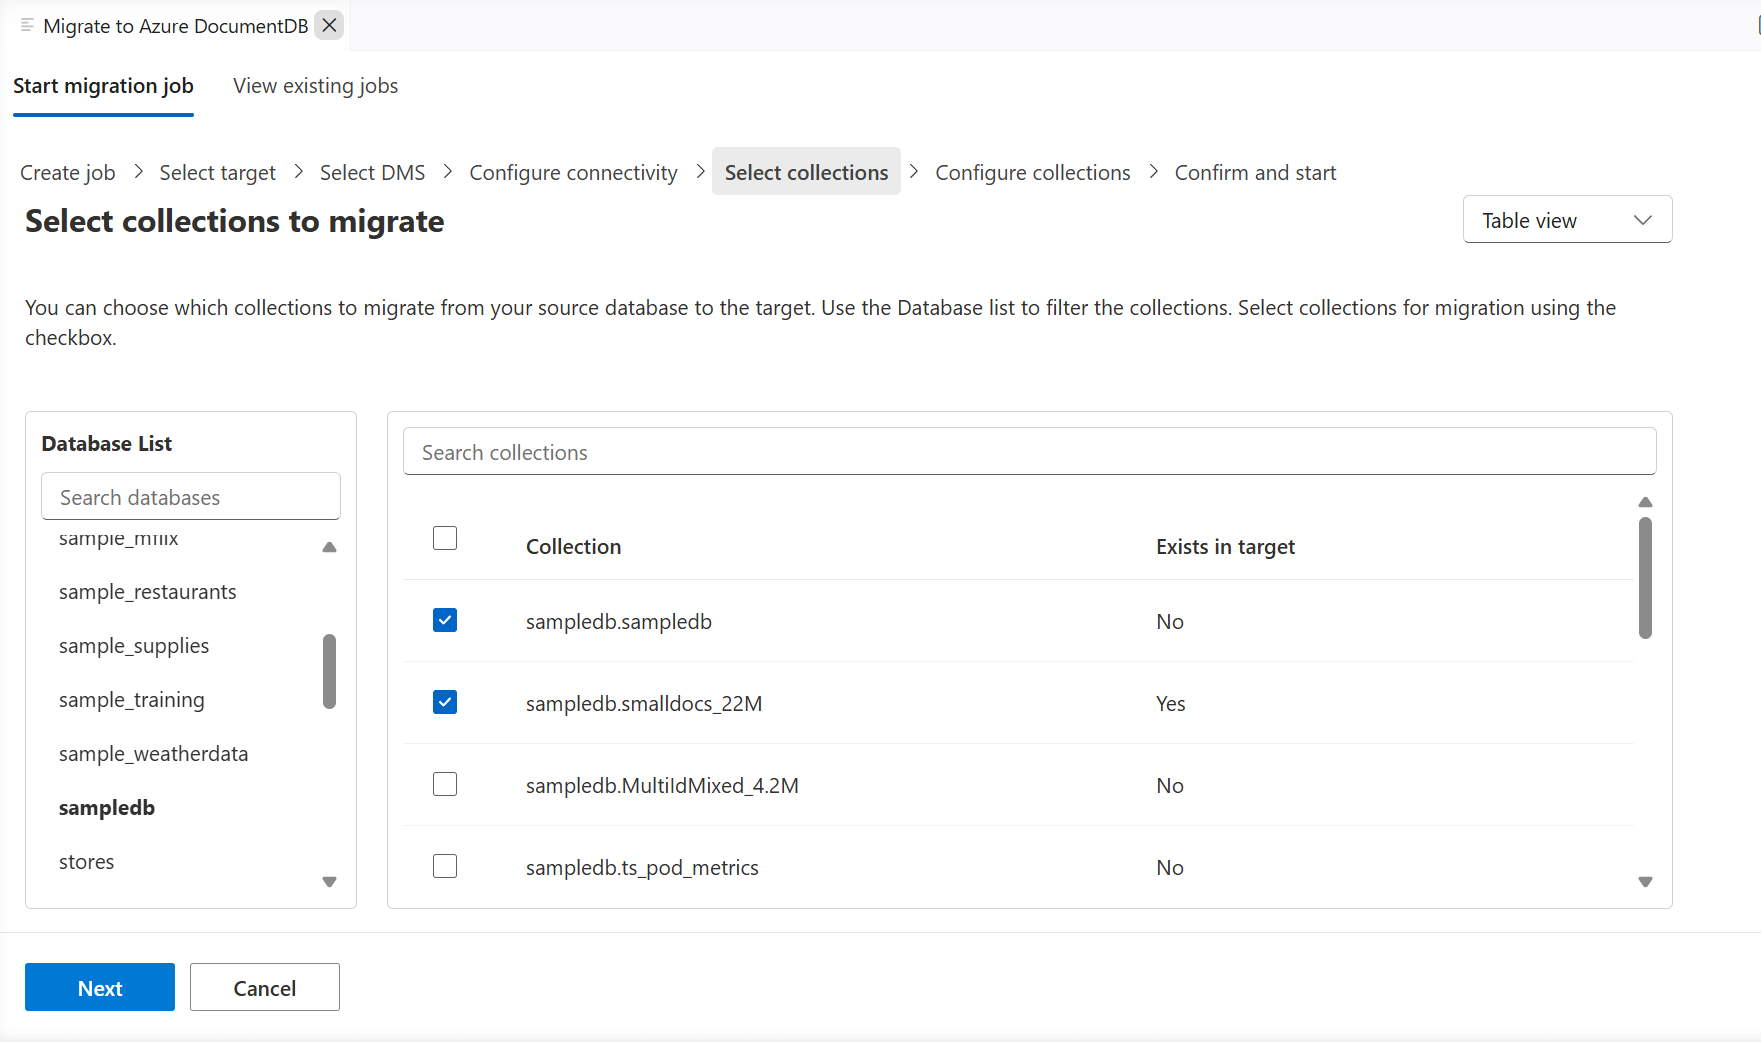
Select the collections to include in the migration job. Use the search options to choose from the list of collections. Collections that already exist in the target are automatically marked Yes in the Exists in Target column.
Tip
Make sure to select all collections you want to include as you can't add collections once the migration job is created.
Select Next to continue.
Step 6: Configure collections
Configure how each selected collection is migrated to the target. For each collection, set the following options:
Overwrite target collection: Specify whether to overwrite a collection that already exists in the target. The Sharding and Indexing options apply only when you set Overwrite target collection to Yes.
Sharding strategy: Choose whether to shard the target collection or leave it unsharded. When you shard the target collection, it uses the same shard key as the source collection.
Indexing strategy: Choose how indexes are built on the target collection:
Do not create indexes: Skip index creation.
Copy indexes from source: Copy all indexes from the source collection. Unique indexes are copied before the initial data load, and nonunique indexes are copied after the initial data load.
Use the inline editor to configure these settings for individual collections, or select Bulk Update to apply the same settings to multiple collections.
Select Next to continue.
Step 7: Confirm and start
Review the migration job details before selecting Start Migration. If you need to update the details, use the Edit Details button.
After you create the migration job, you're automatically redirected to the View Existing Jobs page.
Tip
Azure Database Migration Service runs the data migration tasks. Therefore, you don't need to be connected to the source and target environments during the data migration. The dashboard updates the status at frequent intervals.
Monitor existing migration jobs
Use the View Existing Jobs tab to monitor the migration status of initialized jobs. The selected DMS determines the job list. Use the Change DMS button to change your selection.
The status automatically updates at frequent intervals. Offline jobs automatically complete once the selected collection snapshots are copied to target. However, you need to manually cut over the online migrations.
You can Pause a migration job to temporarily halt it at a logical point. When you're ready to continue, select Resume to pick up from where the job stopped.
To view the collection-wise status, select a row from the table.
Monitor online migrations
Online migrations, unlike offline migrations, don't automatically complete. Instead, they run continuously until you manually finalize them by selecting Cutover.
To complete the online migration, follow these steps in the given order:
The Cutover button is enabled once the initial data load finishes for all collections. At this stage, the job is in the replication phase, continuously copying updates from the source instance to the target instance to keep it up-to-date with the latest changes.
When ready to perform the migration cutover, stop all incoming transactions to the source collections you're migrating.
The Time Since Last Change shows the time gap between the last update and current time.
Monitor the replication changes in the table and wait until the Replication Changes Played metric stabilizes. A stable Replication Changes Played metric indicates that all updates from the source are successfully copied to the target.
Select Cutover when the replication gap is minimal for all collections and the Replication Changes Played metric is stable.
Manually validate that the row count is the same between the source and target collections.
Note
If you perform the cutover operation without validating that the source and target are synced, you can lose data.
Migration scenarios
The Azure DocumentDB Migration Extension supports several source environments, including MongoDB instances running in Azure, on-premises datacenters, and other cloud providers. The extension provides flexible connectivity options to accommodate different network configurations and security requirements.
Supported source environments
The following table summarizes the supported migration sources:
Source environment
Description
Within Azure
MongoDB instances running on Azure Virtual Machines or other Azure-hosted services
On-premises
MongoDB servers running in your local data center or private infrastructure
Other cloud providers
MongoDB instances hosted on other cloud platforms
Amazon DocumentDB
Amazon DocumentDB (with MongoDB compatibility) instances hosted on AWS
Public connectivity
In public connectivity mode, the Azure Database Migration Service (DMS) connects to your source and target servers over the public internet. DMS provides static IP addresses that you add to the firewall allow lists on both the source and target servers. DMS uses a shared public virtual network for all migrations within a given region. While this virtual network is shared across customers, each migration job runs on its own isolated private worker node to ensure job-level isolation.
Use public connectivity when:
Your source and target servers are accessible through public IP addresses.
Your organization's security policies allow connections over the public internet.
You need a simpler setup without virtual network configuration.
Private connectivity
In private connectivity mode, DMS provisions a dedicated private virtual network for each migration job and peers it with your source and target virtual networks. This setup means every job gets both isolated worker nodes and an isolated network, ensuring that no traffic crosses between jobs and no shared network paths exist between customers.
The extension supports up to two virtual networks:
Source virtual network: The virtual network where your source MongoDB server is accessible.
Target virtual network: The virtual network where your Azure DocumentDB cluster is accessible.
Use private connectivity when:
Your source or target servers aren't accessible over the public internet.
Your organization requires all traffic to flow through private networks.
You need to avoid public internet exposure.
Private connectivity relies on DMS to provision a Microsoft-hosted virtual network that peers with your networks. If your organization's policies don't allow connectivity from a Microsoft-hosted virtual network, use the self-hosted migration with Kubernetes option instead.
Important
A single virtual network can support only one active migration job at a time when connectivity mode is private. To run multiple concurrent jobs, use different virtual networks for each job.
Complete the following requirements before starting the migration job:
Disable network policies on the private endpoint subnet. Subnet-level private endpoint network policies can block traffic originating from the DMS virtual network. Disable them on the subnet that hosts the target Azure DocumentDB private endpoint:
Grant the DMS principal read access on the hub's virtual network gateway. When DMS peers with the hub, it validates the gateway configuration to use useRemoteGateways. Assign the Reader role on the VPN or ExpressRoute gateway resource to the DMS service principal. Without this access, the peering setup step in the wizard fails.
Allowlist the DMS CIDR end-to-end. Add the DMS CIDR shown in the migration wizard to your on-premises firewalls, NSGs in the path, and any ExpressRoute route filters. If any device in the path doesn't recognize the range, return traffic from the source is dropped.
Remove resource locks that affect the source or target virtual network. A resource lock on the source or target virtual network, or the source or target resource group, can prevent DMS from deleting the source-to-DMS or target-to-DMS peering after a job finishes. The leftover peering causes a new migration that uses the same CIDR range to fail. Remove the lock before the migration, and reapply it after DMS cleans up the peering.
Don't rely on custom on-premises DNS for the peered network. On-premises DNS servers can't resolve Azure private DNS zone records for the DMS-peered hub. Use an IP-based connection string for the source in the migration job to skip DNS.
Why you select virtual networks and a CIDR range
Private connectivity works by placing DMS inside your private network space so it can reach your source and target over private IP addresses instead of the public internet. To do that, DMS needs two things from you: the virtual networks to connect to, and a CIDR range for its own network. Understanding what each one does helps you avoid the most common setup mistakes.
What the virtual network selections do
DMS can't see your private endpoints on its own. When you select a source virtual network and a target virtual network, DMS creates its own dedicated virtual network and peers it with the networks you selected. Peering is what builds the private path: after peering, DMS can resolve and reach the source MongoDB server and the target Azure DocumentDB cluster over their private IPs.
The virtual network you pick for each side must be the one that actually provides a network path to that endpoint:
Source: Select the virtual network from which the source MongoDB server is reachable over a private IP. If your source is on-premises or in another cloud, this is the virtual network that holds (or routes to) the VPN/ExpressRoute gateway. If the source is in Azure behind a private endpoint, select the virtual network that contains that private endpoint.
Target: Select the virtual network from which the Azure DocumentDB private endpoint is reachable.
Selecting a virtual network that looks related but doesn't have a route to the endpoint is the most frequent mistake. Peering succeeds, but traffic never reaches the source or target because there's no underlying route.
What the CIDR range does
The dedicated virtual network that DMS creates needs its own private IP address space, and you supply that address space as a CIDR range (for example, 10.240.0.0/24). DMS assigns its worker nodes addresses from this range, and those addresses become the source of all migration traffic. This is why the CIDR range appears throughout the validation and firewall steps.
The CIDR range must not overlap with any network it needs to reach. If the DMS CIDR overlaps with your source virtual network, target virtual network, or any on-premises range reachable through your gateway, the network can't tell whether an address is local or remote, so peering fails or traffic is silently misrouted.
Because the CIDR range is the source of all migration traffic, you must also allow it through every firewall or network security group (NSG) that protects the source or target. Add the CIDR range to the source MongoDB firewall, the Azure DocumentDB firewall, and any on-premises or other-cloud firewall in the network path. If the CIDR isn't allowlisted, the traffic is blocked even when peering and routing are correct.
Common mistakes to avoid
Selecting the wrong virtual network. Choose the virtual network that has a real route to the endpoint, not just one with a similar name or in the same resource group.
Choosing an overlapping CIDR. Pick a range that doesn't overlap with your source virtual network, target virtual network, or on-premises address space. Check the existing address spaces first.
Not allowlisting the CIDR through your firewalls. Add the DMS CIDR range to every firewall and NSG that protects the source or target. Traffic is blocked if the CIDR isn't on the allow list, even when peering succeeds.
Choosing a CIDR that's too small. Provide a range large enough for the DMS worker nodes (a /24 is a safe default). A range that's too small can cause provisioning to fail.
Reusing a CIDR that's still in use. If you built a simulation environment to validate connectivity, remove it before starting the real job. A leftover network using the same CIDR conflicts with the one DMS tries to create.
Use your preferred VPN tools to set up network connectivity between Azure and your source environment in another cloud or on-premises. The following topologies are supported depending on your network architecture.
Single virtual network
In this topology, the VPN/ExpressRoute gateway and source workloads are in the same virtual network. DMS peers directly with this virtual network and uses useRemoteGateways to reach the on-premises or other-cloud source.
Hub-direct
In this topology, the VPN/ExpressRoute gateway is in a dedicated hub virtual network. DMS peers directly with the hub, so it can use the gateway natively via useRemoteGateways.
Hub-spoke with TCP proxy
If DMS can only peer to a spoke virtual network and direct hub peering isn't possible, deploy a MongoDB migration proxy VM in the DMS-peered spoke. The proxy forwards traffic from DMS to the source MongoDB server through the hub's VPN/ExpressRoute gateway.
Add an inbound security rule to the network security group (NSG) that protects the proxy. Set Source to the DMS CIDR range that you provide in the migration wizard, and allow TCP traffic to the proxy's listening port. Without this rule, the proxy can't receive requests from the DMS virtual network.
Note
DMS creates an ephemeral virtual network that peers to your networks. In enterprise hub-and-spoke topologies, virtual network peering is non-transitive, DMS can't reach a hub VPN gateway through a spoke virtual network automatically. You need a routing mechanism such as direct hub peering or a TCP proxy deployed in the DMS-peered virtual network. For validation steps, see Troubleshoot connectivity.
From a private endpoint in Azure
Set up private endpoints for the source and target virtual networks.
Self-hosted migration with Kubernetes
Both public and private connectivity rely on Azure Database Migration Service (DMS), which runs in a Microsoft-hosted virtual network. Some environments don't allow inbound connectivity from a Microsoft-hosted virtual network. In these cases, use the self-hosted, Kubernetes-based web application to run the migration entirely within your own infrastructure. The self-hosted tool runs the same migration code as the hosted DMS solution; only the hosting environment differs.
Use self-hosted migration when:
Your organization's security policies don't allow connectivity from a Microsoft-hosted virtual network.
You need full control over the compute and network path used for the migration.
The self-hosted web application migrates any MongoDB source to Azure DocumentDB by using your own Kubernetes cluster. Download and install it from the AzureDocumentDBMigration-K8s repository, then follow the setup instructions in that repository.
Troubleshoot connectivity
When a migration job fails, use these steps to trace where the network connectivity broke down. DMS creates a dedicated ephemeral virtual network for each migration job that is purged as soon as the job completes or fails. You can't inspect the DMS virtual network afterward, so you reproduce its network position to isolate the failure.
Validation prerequisites
Tool
Purpose
Azure CLI (az)
Query Azure networking resources
PowerShell or Bash
Run validation scripts
nc (netcat) or Test-NetConnection
Test TCP connectivity
Network Contributor or Reader RBAC roles
Read access on relevant virtual networks
Public connectivity validation
In public mode, DMS connects to source and target over the public internet by using static IPs that the migration wizard displays.
Validate source firewall
Verify that the source MongoDB server accepts inbound connections from the DMS static IPs:
Expected:TcpTestSucceeded : True or Connection succeeded.
Validate target firewall
Verify the DMS IPs are added to the Azure DocumentDB firewall:
az cosmosdb show \
  --subscription "" \
  -g "" \
  -n "" \
  --query "publicNetworkAccess"
Test target connectivity:
Test-NetConnection -ComputerName -Port 10260
Validate DNS resolution
Resolve-DnsName
Resolve-DnsName
Verify that both hostnames resolve to public IPs. A private IP response indicates a private DNS override.
Public connectivity checklist
#
Check
Command
Expected
1
Source firewall allows DMS IPs
Test-NetConnection -Port 27017
Succeeded
2
Target firewall allows DMS IPs
Verify in portal or CLI
DMS IPs in allow list
3
DNS resolves to public IPs
Resolve-DnsName
Public IP returned
4
Source MongoDB is listening
mongosh
Connected
5
Target DocumentDB is reachable
Test-NetConnection -Port 10260
Succeeded
Private connectivity validation
Private connectivity validation has four phases: validate infrastructure, build a simulation environment, test connectivity from the simulation, and clean up.
Phase 1: Validate infrastructure
Source in Azure
Validate both source and target private endpoints:
# Check source private endpoints
az network private-endpoint list \
  --subscription "" -g "" \
  --query "[].{Name:name,Subnet:subnet.id,Status:privateLinkServiceConnections[0].privateLinkServiceConnectionState.status}" \
  -o table

# Check target private endpoints
az network private-endpoint list \
  --subscription "" -g "" \
  --query "[].{Name:name,Subnet:subnet.id,Status:privateLinkServiceConnections[0].privateLinkServiceConnectionState.status}" \
  -o table
Expected: Status = Approved for both.
Check for CIDR overlap between your virtual networks and the DMS CIDR:
echo "=== Source VNet ==="
az network vnet show --subscription "" -g "" -n "" \
  --query "addressSpace.addressPrefixes" -o tsv

echo "=== Target VNet ==="
az network vnet show --subscription "" -g "" -n "" \
  --query "addressSpace.addressPrefixes" -o tsv
Expected: The DMS CIDR you select in the wizard must not overlap with either virtual network.
Validate that NSGs on source and target subnets allow traffic from the DMS virtual network CIDR:
az network nsg list \
  --subscription "" -g "" \
  --query "[].{Name:name,Rules:securityRules[?direction=='Inbound'].{Rule:name,Priority:priority,Access:access,Source:sourceAddressPrefix,Port:destinationPortRange}}" \
  -o json
Verify: No Deny rules block the DMS virtual network CIDR on MongoDB ports (default 27017) or DocumentDB ports (default 10260).
Validate private DNS zone configuration:
# Check private DNS zones
az network private-dns zone list \
  --subscription "" \
  --query "[?contains(name,'mongo') || contains(name,'cosmos') || contains(name,'documentdb')].{Zone:name,RecordSets:numberOfRecordSets}" \
  -o table

# Verify DNS zone is linked to relevant VNets
az network private-dns link vnet list \
  --subscription "" -g "" -z "" \
  --query "[].{Link:name,VNet:virtualNetwork.id,AutoReg:registrationEnabled}" \
  -o table
Azure-to-Azure checklist:
#
Check
Expected
1
Source private endpoint status
Approved
2
Target private endpoint status
Approved
3
No CIDR overlap between your virtual networks and the DMS CIDR
Distinct address ranges
4
NSGs allow DMS CIDR on required ports
No blocking Deny rules
5
Private DNS zones linked to your virtual networks
Zones linked, records resolve
Source on-premises or other cloud
Validate VPN/ExpressRoute tunnel:
# For VPN Gateway
az network vpn-connection list \
  --subscription "" -g "" \
  --query "[].{Name:name,Status:connectionStatus,IngressBytes:ingressBytesTransferred,EgressBytes:egressBytesTransferred}" \
  -o table
Expected:connectionStatus = Connected, bytes increasing over time.
# For ExpressRoute
az network express-route show \
  --subscription "" -g "" -n "" \
  --query "{Name:name,State:serviceProviderProvisioningState,PeeringState:peerings[0].state}" \
  -o table
The DMS virtual network CIDR must be advertised to the remote network, validate BGP route advertisement:
Verify that the DMS virtual network CIDR appears in the output. If it's missing, set allowGatewayTransit=true on your gateway virtual network peering.
Validate routing depending on your topology:
Single virtual network (no hub-spoke): Verify allowGatewayTransit=true on your virtual network peering.
Hub-direct: Same as single virtual network, but check the hub virtual network peering.
TCP proxy: If DMS can only peer to a spoke and direct hub peering isn't possible, deploy a MongoDB migration proxy VM in the DMS-peered virtual network. The proxy forwards traffic from DMS to the source MongoDB server through the existing VPN/ExpressRoute path. Configure the DMS migration job to use the proxy VM's private IP and listen port as the source endpoint.
Virtual network peering is non-transitive. If DMS peers to a spoke virtual network, it can't automatically reach the hub's VPN gateway. For DMS traffic to reach on-premises/other-cloud sources, you need either direct hub peering (so DMS can use the VPN gateway natively via useRemoteGateways) or a TCP proxy deployed in the DMS-peered virtual network that forwards traffic to the source through your existing network path.
The on-premises or other-cloud network must have return routes for the DMS virtual network CIDR, validate remote-side return routes. For AWS:
For on-premises routers, verify the DMS CIDR appears in the BGP routing table.
The remote side must also allow inbound traffic from the DMS virtual network CIDR on the required ports (default: 27017 for MongoDB).
Note
DMS creates a new virtual network with a dynamic CIDR for each migration job. Use the specific DMS CIDR shown in the migration wizard when configuring remote firewall rules.
On-premises/other cloud checklist:
#
Check
Expected
1
VPN/ExpressRoute tunnel status
Connected, bytes flowing
2
Azure advertises DMS CIDR via BGP
DMS CIDR in advertised routes
3
Virtual network peering allows gateway transit
allowGatewayTransit=true
4
Remote side has return route for DMS CIDR
Route present in route table
5
Remote firewall/SG allows DMS CIDR
Inbound rule on required ports
6
Target private endpoint status
Approved
Phase 2: Build simulation environment
DMS creates an ephemeral virtual network for each migration job that is purged on completion or failure. To test connectivity from the DMS network position, create a simulation virtual network with the same CIDR, peer it to your networks, and deploy a test VM.
Note
Testing from a VM in your existing gateway or spoke virtual network only confirms that your VPN works. It doesn't prove that traffic originating from the DMS CIDR can be routed correctly. The simulation virtual network replicates the exact network position of DMS, so connectivity tests from it are representative of actual migration traffic.
Create a test virtual network
Use the same CIDR you provided (or plan to provide) in the DMS migration wizard:
Expected:{ ok: 1 } for both. If nc succeeds but mongosh fails, networking is working correctly and the problem is likely related to authentication credentials or TLS configuration.
Interpret results
Result
Meaning
Action
Peering state = Disconnected
CIDR overlap or virtual network config issue
Check for overlapping address spaces
nc to source times out
Traffic blocked or not routed
Check firewall rules, return routes, NSGs
nc succeeds, mongosh TLS error
TLS/certificate mismatch
Verify tls=true and cert settings
nc succeeds, mongosh auth error
Wrong credentials
Verify username/password and auth DB
DNS resolves to public IP
Private DNS zone not linked
Link DNS zone to test virtual network
Effective routes show None for source CIDR
No route to source
Check VPN gateway/peering config
Tip
If all tests pass but the migration job still fails, the problem likely lies within DMS-managed components rather than your infrastructure. Contact Azure support with these test results to expedite troubleshooting.
Phase 4: Clean up
Important
Clean up the simulation virtual network and VM before retrying the migration job. If they remain, DMS fails to create its own virtual network and VM due to IP address conflicts.
# Remove the test resource group (includes the test VNet and VM)
az group delete --subscription "$SUBSCRIPTION" -n "$TEST_RG" --yes

# Remove peerings on your existing VNets
az network vnet peering delete --subscription "$SUBSCRIPTION" \
  -g "" --vnet-name "" -n "hub-to-dms-test" 2>/dev/null

az network vnet peering delete --subscription "$SUBSCRIPTION" \
  -g "" --vnet-name "" -n "source-to-dms-test" 2>/dev/null

az network vnet peering delete --subscription "$SUBSCRIPTION" \
  -g "" --vnet-name "" -n "target-to-dms-test" 2>/dev/null
Common connectivity issues
Issue
Symptom
Resolution
DMS CIDR not advertised through BGP
VPN is up but migration reports connectivity errors
Enable allowGatewayTransit=true on gateway virtual network peering
Remote firewall blocks DMS CIDR
Other Azure virtual networks reach source, but DMS times out
Add the DMS CIDR from the wizard to remote firewall rules
Proxy NSG blocks DMS CIDR
The proxy can reach the source, but DMS requests to the proxy time out
In the NSG associated with the proxy VM's network interface or subnet, add an inbound rule that allows TCP traffic from the DMS CIDR that you provide in the migration wizard to the proxy's listening port
Missing return routes
Traffic leaves Azure but never returns; connection times out
Enable route propagation on remote route table or add static route for DMS CIDR
Private endpoint not approved
DNS resolves but connection refused
Approve the private endpoint connection in portal or CLI
DNS not resolving correctly
Hostname resolves to public IP instead of private
Link private DNS zone to the virtual network used for migration
CIDR overlap
Virtual network peering fails or stays Disconnected
Select a DMS CIDR that doesn't conflict with existing virtual networks
Resource lock blocks peering cleanup
A new migration that uses the same CIDR fails because a source-to-DMS or target-to-DMS peering from a previous job still exists
Remove the lock from the source or target virtual network, or either resource group, delete the leftover peering, and retry the migration
Single virtual network for multiple private jobs
Second job fails or interferes with the first
Use different virtual networks for each concurrent migration job
Register Microsoft.DataMigration resource provider in your subscription
To register the Microsoft.DataMigration resource provider in your subscription, follow these steps:
Azure portal
Go to the Azure portal and navigate to your subscription.
In the left-hand menu, select Resource providers under Settings.
Search for Microsoft.DataMigration in the search box at the top.
If it's not registered, select it and select the Register button.
Azure CLI
Open the Azure Cloud Shell or your local terminal.
Run the following command to register the resource provider:
az provider register --namespace Microsoft.DataMigration
PowerShell
Open the Azure Cloud Shell or your local PowerShell.
Run the following command to register the resource provider:
Why are views missing in the select collection screen step when Azure DocumentDB supports views?
Azure DocumentDB supports the creation of new views. However, the migration extension doesn't provide support for migrating existing views.
After the migration finishes, you can always recreate the views.
Which collections and databases does the migration process skip when migrating from MongoDB to Azure DocumentDB?
The migration process considers the following databases and collections as internal for MongoDB:
Category
Description
Databases
admin, local, system config
Collections
Any collection with prefix system.
Does the migration job run locally on my machine?
The migration wizard in VS Code requires network connectivity from your local machine to both the source and target environments. The wizard uses this connectivity to enumerate databases and collections and to submit the migration job. Once you submit the job, you can close VS Code or disconnect from the source and target environments.
Azure Database Migration Service (DMS) executes data migration entirely. DMS is an Azure-hosted service that manages all data movement. DMS doesn't rely on your local machine or VS Code for job execution, so local connectivity isn't required after job submission.
Can I rename databases and collections during migration?
The extension doesn't support database and collection renaming during migration.
How should I configure my source server firewalls to avoid connectivity problems?
The required network configuration depends on the selected connectivity mode:
Public mode: You must allow the IP addresses that the wizard displays on both the source and target firewalls to enable communication.
Private mode: You must enable virtual network integration so that the DMS servers can securely communicate with the source and target endpoints within the virtual network.
How many databases and collections can I migrate in a single migration?
You can include unlimited collections in a single migration.
How many migration jobs can I run simultaneously?
You can run multiple migration jobs when using public access. However, when using private access, a single virtual network supports only one active job at a time. To run multiple jobs with private access, use different virtual networks for each job.
What type of logs does the extension generate?
The extension records errors, warnings, and other diagnostic logs in the default log directory: