

Django is a Python web framework that provides built-in tools for developing database-driven web applications. In this project, we will build a simple voting system where users can view poll questions, select an option, submit their vote, and see the updated results.
1. Creating Project Directory
- Create a new directory and move into it.
- You can also create the directory manually and open it in your code editor.
mkdir pollser_project
cd pollser_project
2. Creating Virtual Environment
- Creating an isolated Python environment for the project.
python -m venv venv
- Activate it on Windows:
venv\Scripts\activate
- For Linux/macOS:
source venv/bin/activate
3. Installing Django
- Install Django Using pip.
python -m pip install django
- Verify Installation:
python -m django --version
- Installed django version will be displayed in the terminal.
4. Creating Django Project
- Create the project in the current directory.
django-admin startproject pollster .
5. Running Development Server
- Check that the project was created correctly.
python manage.py runserver
- Open following address:
http://127.0.0.1:8000/

- If default Django welcome page appears, means it worked successfully.
6. Registering the Application
- Open pollster/settings.py.
- Add polls to INSTALLED_APPS:
INSTALLED_APPS = [
    "django.contrib.admin",
    "django.contrib.auth",
    "django.contrib.contenttypes",
    "django.contrib.sessions",
    "django.contrib.messages",
    "django.contrib.staticfiles",

    "polls",
]
- Without this entry, Django will not load the application as part of the project.
8. Creating Database Models
- Application needs to store a question, its available options, and the number of votes received by each option.
- Open polls/models.py.
- Replace the existing code with this:
from django.db import models


class Question(models.Model):
    question_text = models.CharField(max_length=200)
    pub_date = models.DateTimeField("date published")

    def __str__(self):
        return self.question_text


class Choice(models.Model):
    question = models.ForeignKey(
        Question,
        on_delete=models.CASCADE
    )
    choice_text = models.CharField(max_length=200)
    votes = models.IntegerField(default=0)

    def __str__(self):
        return self.choice_text
Explanation:
- Question stores the poll text and publication date.
- Choice stores each available option.
- ForeignKey connects a choice to its question.
- Votes keeps the current count.
- str() makes records easier to identify in Admin.
9. Creating and Applying Migrations
- Generate a migration from the models:
python manage.py makemigrations
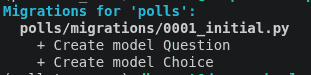
- Apply to the database:
python manage.py migrate

- Django will create the required tables.
- Project uses SQLite by default, so no separate database server is required.
10. Configuring Django Admin
- Django Admin will be used to create and manage polls.
- Open polls/admin.py.
- Replace the existing code with:
from django.contrib import admin

from .models import Choice, Question


class ChoiceInline(admin.TabularInline):
    model = Choice
    extra = 3


@admin.register(Question)
class QuestionAdmin(admin.ModelAdmin):
    list_display = ("question_text", "pub_date")
    ordering = ("-pub_date",)
    inlines = [ChoiceInline]


admin.site.site_header = "Pollster Admin"
admin.site.site_title = "Pollster Admin"
admin.site.index_title = "Pollster Administration"
11. Creating a Superuser
- Create an administrative account:
python manage.py createsuperuser
- Enter the requested username, email address and password.
- Start the server:
python manage.py runserver
- Open the admin login page directly:
http://127.0.0.1:8000/admin/

- Default Django welcome page at the root URL does not contain an Admin login button. The admin interface has its own URL.
12. Adding a Question
After Logging into Django Admin:
- Open Questions.
- Click Add Question.
- Enter a Question
- Add the available choices.
- Save the record.
Example:

13. Creating Application URLs
- Creating polls/urls.py
- Add this code in the file:
from django.urls import path
from . import views
app_name = "polls"
urlpatterns = [
path("", views.index, name="index"),
path("/" , views.detail, name="detail"),
path(
"/results/" ,
views.results,
name="results",
),
path(
"/vote/" ,
views.vote,
name="vote",
),
]
- URL namespace polls allows templates to refer to these routes using names such as polls:index and polls:detail.
14. Connecting the Application URLs
- Open pollster/urls.py
- Replace the code content with:
from django.contrib import admin
from django.urls import include, path


urlpatterns = [
    path("polls/", include("polls.urls")),
    path("admin/", admin.site.urls),
]
- URL is now available at:
http://127.0.0.1:8000/polls/
15. Creating the Template Directory
- Inside pols, create template/polls.
- There create base.html, index.html, details.html, results.html.

16. Creating the Base Template
- Open polls/templates/polls/base.html
- Add this to the file:
<html lang="en">
<head>
    <meta charset="UTF-8">
    <meta name="viewport" content="width=device-width, initial-scale=1.0">

    <title>
        Pollster
        {% block title %}{% endblock %}
    title>

    <style>
        * {
            box-sizing: border-box;
        }

        body {
            margin: 0;
            font-family: Arial, sans-serif;
            background: #f4f6f8;
            color: #222;
        }

        nav {
            background: #1f2937;
            padding: 15px 20px;
        }

        nav a {
            color: white;
            text-decoration: none;
            font-size: 20px;
            font-weight: bold;
        }

        .container {
            width: 90%;
            max-width: 800px;
            margin: 40px auto;
        }

        .card {
            background: white;
            border-radius: 8px;
            padding: 20px;
            margin-bottom: 20px;
            box-shadow: 0 2px 8px rgba(0, 0, 0, 0.08);
        }

        .button {
            display: inline-block;
            padding: 10px 16px;
            margin-top: 10px;
            border: none;
            border-radius: 5px;
            background: #2563eb;
            color: white;
            text-decoration: none;
            cursor: pointer;
        }

        .button:hover {
            background: #1d4ed8;
        }

        .secondary {
            background: #4b5563;
        }

        .secondary:hover {
            background: #374151;
        }

        .choice {
            margin: 15px 0;
        }

        .error {
            padding: 12px;
            border-radius: 5px;
            background: #fee2e2;
            color: #991b1b;
        }

        ul {
            padding-left: 20px;
        }

        li {
            margin-bottom: 12px;
        }
    style>
head>

<body>

    <nav>
        <a href="{% url 'polls:index' %}">
            Pollster
        a>
    nav>

    <main class="container">

        {% block content %}
        {% endblock content %}

    main>

body>
html>
- Contains the common page layout.
- Other templates will inherit it instead of duplicating the same HTML structure.
17. Creating Poll List Page
- Open polls/templates/polls/index.html
- Add this to the file:
{% extends "polls/base.html" %}

{% block title %}
    - Polls
{% endblock %}

{% block content %}

<h1>Poll Questionsh1>

{% if latest_question_list %}

    {% for question in latest_question_list %}

        <div class="card">

            <h2>{{ question.question_text }}h2>

            <p>
                Published:
                {{ question.pub_date }}
            p>

            <a
                href="{% url 'polls:detail' question.id %}"
                class="button"
            >
                Vote Now
            a>

            <a
                href="{% url 'polls:results' question.id %}"
                class="button secondary"
            >
                Results
            a>

        div>

    {% endfor %}

{% else %}

    <div class="card">
        <p>No polls are available.p>
    div>

{% endif %}

{% endblock %}
- Page receives the latest questions from the index view and creates links for voting and viewing resulting.
18. Creating Voting Page
- Open polls/templates/polls/detail.html
- Add this to the file:
{% extends "polls/base.html" %}

{% block title %}
    - Vote
{% endblock %}

{% block content %}

<a
    href="{% url 'polls:index' %}"
    class="button secondary"
>
    Back to Polls
a>

<div class="card">

    <h1>{{ question.question_text }}h1>

    {% if error_message %}
        <p class="error">
            {{ error_message }}
        p>
    {% endif %}

    <form
        action="{% url 'polls:vote' question.id %}"
        method="post"
    >

        {% csrf_token %}

        {% for choice in question.choice_set.all %}

            <div class="choice">

                <input
                    type="radio"
                    name="choice"
                    id="choice{{ forloop.counter }}"
                    value="{{ choice.id }}"
                    required
                >

                <label for="choice{{ forloop.counter }}">
                    {{ choice.choice_text }}
                label>

            div>

        {% empty %}

            <p>No choices are available for this question.p>

        {% endfor %}

        <button
            type="submit"
            class="button"
        >
            Vote
        button>

    form>

div>

{% endblock %}
- Form uses post because submitting a vote changes stored data.
- CSRF token protects the request, while required on the radio input prevents an empty submission in the browser.
19. Creating Results Page
- Open polls/templates/polls/results.html
- Add this to the file:
{% extends "polls/base.html" %}

{% block title %}
    - Results
{% endblock %}

{% block content %}

<div class="card">

    <h1>{{ question.question_text }}h1>

    <h2>Voting Resultsh2>

    <ul>

        {% for choice in question.choice_set.all %}

            <li>
                {{ choice.choice_text }}:
                {{ choice.votes }}
                vote{{ choice.votes|pluralize }}
            li>

        {% empty %}

            <li>No choices are available for this question.li>

        {% endfor %}

    ul>

    <a
        href="{% url 'polls:index' %}"
        class="button secondary"
    >
        Back to Polls
    a>

    <a
        href="{% url 'polls:detail' question.id %}"
        class="button"
    >
        Vote Again
    a>

div>

{% endblock %}
- Each option is displayed together with its current count.
20. Creating Views
- Open polls/views.py
- Replace the existing code with:
from django.http import HttpResponseNotAllowed, HttpResponseRedirect
from django.shortcuts import get_object_or_404, render
from django.urls import reverse

from .models import Choice, Question


def index(request):
    latest_question_list = Question.objects.order_by("-pub_date")[:5]

    return render(
        request,
        "polls/index.html",
        {
            "latest_question_list": latest_question_list,
        },
    )


def detail(request, question_id):
    question = get_object_or_404(
        Question,
        pk=question_id,
    )

    return render(
        request,
        "polls/detail.html",
        {
            "question": question,
        },
    )


def results(request, question_id):
    question = get_object_or_404(
        Question,
        pk=question_id,
    )

    return render(
        request,
        "polls/results.html",
        {
            "question": question,
        },
    )


def vote(request, question_id):
    if request.method != "POST":
        return HttpResponseNotAllowed(["POST"])

    question = get_object_or_404(
        Question,
        pk=question_id,
    )

    choice_id = request.POST.get("choice")

    if not choice_id:
        return render(
            request,
            "polls/detail.html",
            {
                "question": question,
                "error_message": "Please select a choice.",
            },
        )

    try:
        selected_choice = question.choice_set.get(
            pk=choice_id,
        )

    except Choice.DoesNotExist:
        return render(
            request,
            "polls/detail.html",
            {
                "question": question,
                "error_message": "The selected choice is invalid.",
            },
        )

    selected_choice.votes += 1
    selected_choice.save()

    return HttpResponseRedirect(
        reverse(
            "polls:results",
            args=(question.id,),
        )
    )
- It provides the small amount of application logic needed for the project.
- Index retrieves recent questions.
- detail loads a selected poll.
- results retrieves data for the result page.
- vote validates the request, updates the selected choice, and redirects.
21. Running Application
- Start the server:
python manage.py runserver
- Open:
http://127.0.0.1:8000/polls/

22. Testing Complete Voting Flow
Follow these steps:
- Open Django Admin.
- Create a question with several choices (like the given example).
- Open the voting application.
- Select Vote Now
- Choose One option.
- Click vote.
- Check the displayed results.

- Selected option should have its count increased by one.
At last, We have built a functional voting system using Django with database-backed questions, multiple choices, an administrative interface, voting forms, and result pages.